Quick Soup
September 16, 2010
I will be posting soon about the treasures I got this summer- but I realized this is Thursday and I have some stuff to get done before Saturday morning (I visit my Grama). And, the eBay 10 cent insertion fee deal ends TODAY- I need to get off my duff and list some stuff!
Here is a quick recipe for this busy day- super yum and kid friendly- AND I think it was from Cooking Light!
8 ounces hot or sweet turkey Italian sausage
2 cups fat-free, less-sodium chicken broth
1 (14.5-ounce) can diced tomatoes with basil, garlic, and oregano
1/2 cup uncooked small shell pasta
2 cups bagged baby spinach leaves
2 tablespoons grated fresh Parmesan or Romano cheese
2 tablespoons chopped fresh basil
Heat a large saucepan over medium heat. Remove casings from sausage. Add sausage to pan, and cook about 5 minutes or until browned, stirring to crumble. Drain; return to pan.
Add broth, tomatoes, and pasta to pan, and bring to a boil over high heat. Cover, reduce heat, and simmer 10 minutes or until pasta is done. Remove from heat; stir in spinach until wilted. Sprinkle each serving with cheese and basil.
I’m Still Here!
September 14, 2010
Hi everyone! Miss me? I know my blogging lacks….consistency. But I look at other blogs, and it’s tantamount to trying on bathing suits with Heidi Klum- I’m intimidated. But I will persist!
I have also had a stinky summer. Two deaths in my family, helping with funerals and cleaning and hosting relatives, lots of driving, and right before the kids came home from grandparents’ house my hubby hurt himself at work and has been way-laid on bed rest and loopy pain drugs!! So I’m striving to “let go, and let God.” At times you really need to just surrend and realize you have no control over life.
Moving on- school has started, and I found a great granola bar recipe. I tried it last night- in true Sam-fashion, my changes are: grape nuts and milled flax seed instead of wheat germ (didn’t have any in the pantry), 1 cup of Craisins for the dried fruit (decided to guess an amt.) and I threw in a small handful of choc. chips I had left over from another recipe. Yummo! Next I will make a tropical dried fruit and nut bar with coconut.
If you still have real tomatoes available, I suggest making pasta sauce. The other week I made tomato sauce the crockpot. I didn’t follow a recipe- I just blanched*, peeled, seeded** and chopped up tomatoes, threw them in the crockpot with some sautéed (in olive oil) onion, green pepper, garlic and carrot (all diced in food processor), some tomato paste, fresh rosemary, s&p, bit of sugar, Italian seasoning, red wine and a few meatballs for flavor.
* Cut a shallow X in the bottom of the tomatoes, drop in a pot of boiling water for 15-45 seconds, then quickly drop in ice water. the peel will slide right off. Works the same with peaches.
** Just squeeze a cut tomato till the seeds squoosh out!
If you have access to REALLY good real tomatoes, I suggest making an open-faced tomato and feta sandwich with basil.
It’s quite scientific- mix some feta with mayo, pepper and chopped basil. Slather the mixture on your bread (this was homemade bread), place a layer of tomato on top- CHOW DOWN!
Back soon with a new post- I want to show you some of the junk wonderful new treasures I acquired this summer.
Butterfly Tutorial
April 10, 2010
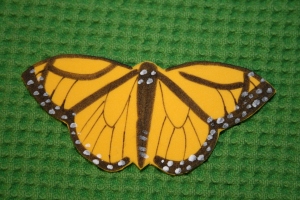
I’m going to try a tutorial! I made these butterflies last month and thought you might like them too. I made them as palanca for a Cursillo weekend. This idea is not original to me- I received it as a present on my Cursillo weekend a few years ago. I’m not sure where the butterfly came from, but I devised this tutorial myself.
Materials
- yellow or orange foam sheet (I normally hate foam, but it’s perfect for this craft)
- Pencil
- Scissors- regular ones and small cuticle/fingernail (optional but helpful)
- Black Sharpie pens- regular thick one and an ultra fine
- White paint and small paintbrush
- Adhesive-backed pin backs (self-sticking)
1) First make a butterfly template. I used the butterfly I had to help me out, but really you can just look at a photo (or use mine above) and draw one. It’s easiest to sketch half of it on a folded piece of cardboard and then cut out so it is symmetrical (like making a heart).

My template was about…. 3.5″ wide?
2) Trace as many butterflies as you want/need onto the foam sheet with the pencil. Cut them out. This is where the cuticle scissors help!
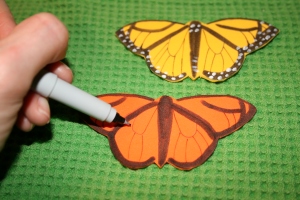
3) Using the thicker Sharpie pen, start drawing the markings. I photographed them in order so you can see how simple it really is.
a) body down center
b) bottom edges-thick
c) top edge- thin
d) 2 curving lines bisecting each wing
e) curves on tips of wings
f) curves on tops of wings
4) Next, using the ultra fine Sharpie, mark the fine lines. Use my butterflies as a guide, or the butterfly photo. (sorry I don’t remember it’s link)
5) Almost done! Get out the white paint and your fine paintbrush and paint the dots. As you can see, they are mostly along the bottom edge and tips of the wings. And a few faint stripes at the base of the body.
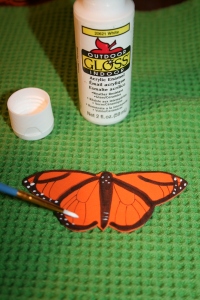
Once all your babies are done, attach the pin backs by just peeling the paper off the adhesive and slapping them on!
Admire all the work you’ve done. Time to set them free!!
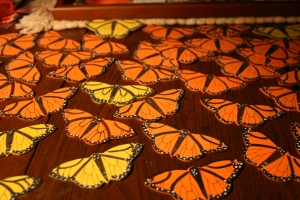
You could use these for palanca, to describe Easter in church, as a craft when teaching the butterfly life cycle- even have a Velma Gratch party!
I hope you liked this and it was helpful in some way. Let me know if I was unclear……
Thanks!
~S
Wait and See!!
April 9, 2010
Quiet….
April 9, 2010
I don’t know about you, but the quiet in the morning when everyone is in bed is just heavenly. Of course I’m not talking about the 5 a.m. morning, but 9:30 a.m. during Easter Break. The cats are running around, the TV is off, hot tea is at hand– ahhh…..
I have lots of catching up to do- and I will! I think I will even try to schedule posts for publishing on subsequent days—ooooh!
First up- those Christmas gifts I said forever ago I was going to post.
For the kids I made Christmas quilts and matching pillowcases. The quilts are just a simple checkerboard of 2 fabrics. Flannel on the backs.
 girl quilt
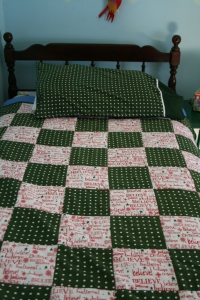 boy quilt
Sorry for the bad photos! Bad lighting and all…
For the grandparents I made silhouettes of the kids. Easy-peasy, looks fancy- just takes time. I photographed the kids’ shadows (or you could photograph a side view of their heads on a light background) and then printed them on regular paper in black and white. [Mind you, I don’t have Photoshop or such, or this could be a LOT easier] I outlined the heads in pen, cut them out, and then scanned that into the computer again. I did this so I could print the silhouettes directly onto nice paper in the future. I printed these onto blue paper in this case, cut them out, and mounted them on scrapbook paper in frames (all cheap, from Michaels).

Lastly I made a doll for my daughter! I used the Mimi Kirschner pattern on purl bee. “Virginia,” as she was named on Christmas day, was not hard to make- just time consuming. It took me probably 6 hours to do the doll itself. (I’m sorta guessing- I started after the kids left for school and finished right before they got home. I DID have lunch and all in there too…) The dress and embellishments took a few more hours.
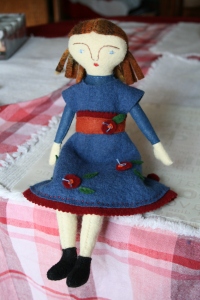

I used a combination of purchased wool felt and wool I felted myself. I really like her hair- it’s plaid! I thought that was cool to infer highlights and shades and all instead of plain monotone brown.
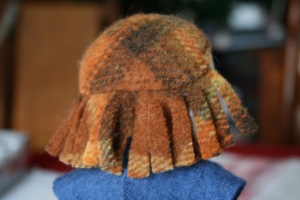
I have 2 more partially done- well, one started and one planned in my head!!
And lastly I decorated these houses (for ME!)- bought at Michaels. I wanted them to look vintage, and they came out more Mary Englebreit. Still very cute! I used those crazy cheap Christmas picks for decoration- I thought I was smart to use them for trees and bushes. The only problem was that they melted easily in the hot glue- made it tricky. The other decorations were tiny tree ornaments and pipe cleaners.

That’s it for now!
Super Bowl Eats
February 4, 2010
One of the new blogs I frequent is Life As Mom– I recommend subscribing to it! It’s about parenting, family, saving money, trying to keep your sanity, etc.
She put a call out for Super Bowl recipes- I’m game! We generally do they typical “manly” foods- stuff with meat, stuff with cheese. Dips, chips. (and some veggies to wash it all down)
One recipe I’d eat up all by myself if I had the chance (admit it- you would too!) is that Buffalo Chicken Dip. Mama mia!! Here is one recipe that I’ve made- it was on Rachael Ray- David Garrard’s Buffalo Chicken Dip.
2 cups cooked chicken (a store-bought rotisserie chicken works best), shredded
1/2 cup buffalo wing sauce, recommended brand Texas Pete
2 tablespoons butter, melted
1/2 cup blue cheese dressing (eyeball it)
1/4 to 1/2 cup shredded mozzarella cheese (eyeball it)
Preheat oven to 300°F.
Cover the bottom of an 8×8″ dish or pie plate with cream cheese.
In a large mixing bowl, combine the shredded chicken, wing sauce and butter, and pour over the cream cheese-filled dish or pie plate.
Top with just enough blue cheese dressing and mozzarella cheese to cover (adding too much cheese will cause a thick skin to form that will make eating the dip difficult once the cheese cools).
Heat the dip in the oven for 20 minutes. Serve with Scoops (Tortillas or Fritos) alongside for dipping.
Cupcakeityness
February 3, 2010
Ok, I know I said I was going to next post about my Christmas crafts, but it’s late at night, and I’ve been taken over by cupcake fever. Maybe it’s because I’m organizing a Tea, maybe it’s just because I’ve always thought cupcakes were so CUTE!! So here are a few things I’ve stumbled across in the past few days.
#1- I’ve been ogling the new (at least to me) stamp and punch packs by Martha Stewart at Michael’s. With my trusty 40% off coupon in hand, I bought the cupcake one. (Because I needed it- for Valentine’s cards…) It comes with 3 rubber stamps, so you can do the icing/sprinkles in a different color from the cupcake liner, or you can just use the all-in-one stamp. Then you use the punch to cut them out. Look how cute!
I experimented stamping and punching on different papers and then pasting icings on top of different liners. The weird things in the middle are the clear rubber stamps.
#2- In searching for cupcake ideas I found this super cupcake ornament tutorial by Bake It Pretty. It’s quite simple, but they do a great job explaining the steps.
#3- THEN I see that Bake It Pretty was kind enough to make darling printable cupcake gift tags!!! I had to print these out for future use….
By the way, have you been looking at something like this  recently? Tomorrow will be day number THREE of no school. And another snow storm is expected this coming weekend! Usually central Virginia get icy yuck, so this is a treat. It was too fluffy f0r a snowman, but great for sledding.
Until tomorrow!
~S
And Happy 2010
January 3, 2010
Goodness, I stink at blogging! I don’t know how angry chicken or crazy mom quilts put so much on their blogs, much LESS do all that they do AND be moms, wives, daughters, etc……….
So on with the new year! We are home after church, wearing jammies on this cold COLD day, enjoying the last hours of vacation before the school routine starts again. I enjoyed Christmas but I’ll be glad to NOT go anywhere any time soon. We traveled to the D.C. area right after the big snowfall, visited the Smithsonian for the day (first time for my kids), and picked up the kids later in the break in Gastonia, NC (at Mary Jo’s of course!!).
But back to Christmas- I’ll start with my cooking/baking.
This is what I made for teacher gifts- in fact I was good and made them in September and froze them! I packaged them in a cute bag with some fancy cocktail napkins (bought after Xmas last year, of course!).
Cream Cheese Pound Cake (Martha recipe- Everyday Food Dec ‘03)
1 1/2 cups (3 sticks) unsalted butter, at room temp.
8 ounces (1 bar) cream cheese, at room temp.
3 cups sugar
6 large eggs
1 teaspoon vanilla extract
3 cups all-purpose flour
2 teaspoons salt
3 tablespoons rum (optional)
Preheat oven to 350°. Generously coat two 8.5-by-4.5-by-2.5-inch loaf pans with cooking spray. (Or, alternately, use a 4-quart bundt pan.)
In a large electric mixer, cream butter and cream cheese together until smooth. Add the sugar and beat until light and fluffy, about 5 minutes. Add the eggs one at a time to creamed mixture, beating until well combined. Mix in vanilla.
Combine the flour and salt in a separate bowl. With the mixer on low, add the dry ingredients to the creamed mixture in two additions, mixing until just combined. Immediately spoon the batter into the prepared pans. Smooth the top of the batter so that that is evenly fills the pans.
Bake at 350° until golden and a toothpick inserted in the center comes out almost clean with just a few moist crumbs attached. This will take about 60 to 75 minutes for the loaf pans, maybe 5 minutes more for the single bundt pan. Be careful that the cake tops do not brown too quickly. If this starts to happen, tent with aluminum foil.
Let the cakes cool in the pan for 10 to 15 minutes, and then turn out the cakes to cool completely. With the loaf pans, the cakes should cool on a wire rack with the top sides up. (If using a bundt pan, just invert the cake onto a serving platter to cool there.) Sprinkle rum evenly over the tops of the two loaves (or the bundt cake). Let cool completely before serving. (Best let sit at least a day before serving)
Store wrapped in plastic 3 days at room temp., or freeze for up to 3 months
Other yummies I made were gingerbread cookies, eggnog cookies (following the suggestions in the reviews), espresso chocolate icebox cookies (using espresso powder instead of coffee granules and extract), and Christmas sandies (tip- dip only the tops in sprinkles, not the bottoms).
I made regular thumbprint cookies with the kids, but look at this recipe I didn’t get to- pepper jelly cornmeal cups– WOW!
Next year (yes, I’m already planning for Christmas 2010!) I’m going to make hot fudge for one of my gifts. I tried this at a friend’s house- delish! Here is the recipe if you want to start before me:
Hot Fudge
12 oz. choc. chips (bittersweet)
14 oz. sweetened condensed milk
14 oz. corn syrup
½ lb. butter (2 sticks)
optional ½ c. flavored liquor
Melt chips and corn syrup. Add and melt butter. Add canned milk. Mixture simmered- do not boil- to thicken (about 5 minutes). Cool. Keep refrigerated.
Makes approximately 3 pints.
There’s my cooking wrap-up, albeit just a partial listing.
Next, I’ll post about the gifts I made for Christmas!
Bye till next time!
~S
Now it’s November
November 4, 2009
I mean, DUH, you know that it’s November. But time is getting away from me as always!
I’m not subbing today and I’m glad- my to-do list is LOOONG. So I can’t stay here long- just a quick note.
Handmade Holidays is back!!! EEEEKKKK!!!
– I recommend these Pumpkin Cheesecake muffins. And no, I don’t think these can legally be called muffins- they are cupcakes in disguise!!
I know there is more I want to show you, but I can’t think now.
Later………!
~S
And it’s October
October 16, 2009
I’m doing a horrendous job keeping up with this thing! Well, school did start and all that goes with it, so I’ll use it as my excuse.
I didn’t get a booth at my church’s bazaar this Fall- just too much going on to make myself even MORE crazy. I did put some things in the Gallery show in Richmond though.
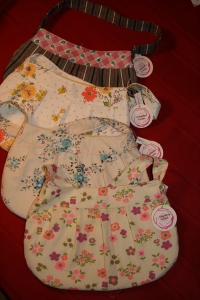 I made these Buttercup Bags for the show- aren’t they cute?!? If they don’t sell (which would be a travesty!!) I’ll probably put them on etsy – OH! I registered for an etsy account! I’ll give you more info once I actually have something for sale….
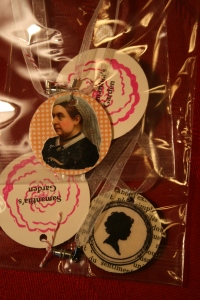 And some wooden disk pendants on handmade organza ribbon necklaces…..
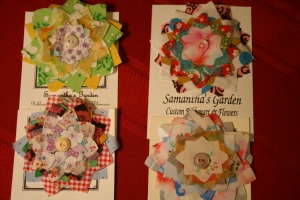
And some of my scrappy flower pins.
This week I also sent some handmade notebooks to GA to benefit a doll club. I think they turned out SO cute- especially since I used my own original photography.
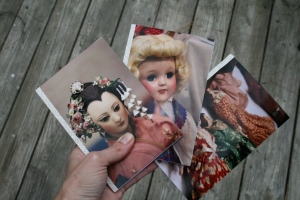
Front of notebooks
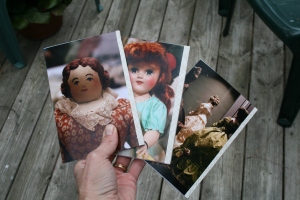
Backs of notebooks
I used the Photojojo tutorial.
Happy World Bread Day! Yup, October 16th. You are probably saying to yourself- “sugar smacks! I forgot to make bread today!” Well you are in luck- here is a quick and SUPER delicious bread recipe you can make right now.
Jiffy Beer Bread
3 c. self-rising flour*, 3 T. sugar, 1- 12 oz. can or bottle of beer
- Mix flour and sugar in a bowl; make a well in the center. Add beer, stir till blended.
- Bake at 350 degrees in a greased bread pan for 60 minutes. Turn out immediately.
- Try not to grab a stick of butter and eat it all yourself!!
* 1 c. self-rising flour= 1 c. all-purpose flour + 1 1/4 t. baking powder + a pinch of salt
This recipe sounds good too- I haven’t tried it yet.
CIDER BREAD
3-1/2 c. flour
2 tsp. baking soda
3 tsp. cinnamon
1/2 tsp. ginger
3 c. sugar
1 tsp. salt
- Stir together. Make a well in center and add, in order:
1 c. vegetable oil
4 whole eggs
1 1/2 c. canned pumpkin
2/3 c. apple cider
1/2 c. thick applesauce
- Mix everything until smooth. Pour into greased and flour pan.
- Makes two 8 1/2 x 1 1/2 x 2 1/2 loaves. Can also be baked in one-pound coffee cans. If baked in can, fill 2/3 full. Makes 3.
- Bake for 1 hour at 350 degrees.
I’m off to figure out dinner………
~S

